MPE Insight User Guide
A real-time performance environment for expressive MIDI and MPE data. This guide covers every module, setting, and workflow.
What is MPE?
MIDI Polyphonic Expression assigns each note its own MIDI channel, enabling independent pitch bend, pressure, and timbre per finger.
What MPE Insight does
It reads every MPE message in real time and routes it to nine modules at once: eight visual analysis engines plus the DRIFT processor.
Five expression signals
Pressure · Pitch Bend (Glide) · Timbre (CC74) · Velocity · Release Velocity, all tracked per note, per channel.
No setup required
Connect any MIDI keyboard, open MPE Insight, select your MIDI input, everything runs immediately. Without an MPE controller, arm DRIFT with one click and it supplies the per-note expression. That switch is the only setup step there is: the app always starts with DRIFT off.
Requirements
Operating system: Windows 10 version 1803 or later, or Windows 11, 64-bit, or macOS 12 or later on Apple silicon. On Windows the app runs on WebView2, which is pre-installed on all modern systems and is where the 1803 floor comes from. The macOS build is Apple silicon only, Intel Macs are not supported. MPE Insight is sold as a direct download, on Steam and on the Mac App Store; there is no Linux build.
Graphics: Any modern GPU, a dedicated one is recommended for FORGE. Two FORGE passes, Point Cloud and Cells, additionally need WebGL2, which every current system provides. Without it those rows grey out rather than disappear, and nothing else is affected.
MIDI controller: Any class-compliant MIDI device. An MPE controller sends five expression dimensions per note straight away. With an ordinary keyboard, the built-in DRIFT processor generates that per-note pressure, pitch and timbre motion itself, so every module, and every synth downstream, receives a real MPE stream. No drivers or plugins required, MPE Insight reads standard per-channel MIDI messages directly.
Controllers that already send MPE include:
None of these is a requirement. An ordinary keyboard, a pad controller or a .mid file reaches every module the same way, with DRIFT supplying the per-note expression.
First Launch
-
1
Activate your license (direct download only)
If you bought MPE Insight from the website, enter your license key in the activation screen. The key is in your purchase confirmation email. Format: XXXX-XXXX-XXXX-XXXX.
Copies from the Mac App Store and from Steam need no key and no sign-in of any kind. There is no activation screen in those builds, so start at step 2.
-
2
Connect your MIDI controller
Plug in your device before or after launching, MPE Insight detects new devices automatically.
-
3
Select your MIDI input
Click the MIDI input indicator in the toolbar. A list of connected devices appears, click to activate one or more.
-
4
Play
All active modules respond immediately to incoming MPE data.
MIDI Signal Flow
Every source (your controller, the 🎞 MIDI File player, the demo engine) runs through a single router, optionally through the DRIFT processor, then out to the visual modules, your synth, and the recorder. The recorder's exported .mid can be re-imported and run through DRIFT all over again, and the visual modules can in turn feed their live picture into FORGE, alone or combined.
MIDI Input
Click the MIDI input status indicator in the toolbar to open the device list. Each device shows its manufacturer name and a green dot when active. Multiple devices can be enabled simultaneously.
MPE Insight receives all standard MPE messages: Note On/Off, Poly Aftertouch, Channel Pressure, Pitch Bend, CC74 (Timbre/Brightness), Mod Wheel, Program Change, and MIDI Clock.
Bend range
Pitch bend arrives as a position, never as an interval, so how far that position really reaches is something the instrument has to declare. It declares it per channel, with RPN 0, and MPE Insight reads that declaration and uses it everywhere a bend is drawn or read out in semitones. Until an instrument says otherwise the MPE default of 48 semitones per note applies, so a controller set to anything else is drawn at its true deflection from the moment it announces itself, without a range setting of your own anywhere. Most controllers send that announcement only at power-up or when their zone changes, which is why the MIDI Stream Log lists it on connect rather than while you play. Where a module offers fixed values beside Auto, a fixed value is a display zoom for making small bends legible: it changes the picture, never the incoming data.
Playing without a controller
The ⌨ Play pill in the toolbar holds both ways to make notes without hardware: Typing Keys and Mouse Mode. Whichever you use, the notes travel the same path as a plugged in controller, so all modules, the Stream Log, the recorder and MIDI Thru react exactly as they would to real hardware.
Typing Keys
Play with your computer keyboard.
The layout is the one a pianist already knows: two manuals, black keys physically above their white keys. The upper manual starts on Q, the lower one on Z, and both span an octave plus its top C, so they overlap on a single shared note like the two halves of one keyboard.
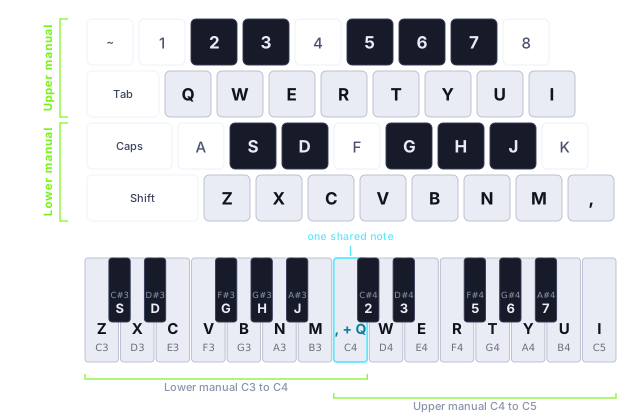
Upper manual
White keys Q W E R T Y U I, black keys 2 3 5 6 7.
Lower manual
White keys Z X C V B N M , black keys S D G H J.
Performance keys
Space is the sustain pedal, Shift accents the note. The octave moves with ↑ ↓ or the numpad + − keys, so you never have to reach for the mouse mid phrase.
Both manuals always start on a C, because that is the only anchor where the black key row lines up with the keys under it. Every key of the selected keyboard size stays reachable: at the lowest step the block hangs over the bottom edge the way an octave switch on a hardware controller does, so the three keys below C1 on an 88 key layout can be played too, while the block's own keys below the keyboard simply are not drawn.
Keys are matched by their physical position, not by the letter printed on them, so the geometry is identical on QWERTY, QWERTZ and AZERTY boards. While Typing Keys is armed, the Keyboard module prints each mapped key's letter onto the piano, using your own keyboard layout where the system reports it.
Mouse Mode
The other way in, and the expressive one: click or touch the Keyboard or PB / Mod module to send real MPE notes. Each pointer gets its own member channel, so multi touch chords work. Drag along X for Pitch Bend, up for Pressure, down for CC74. Both playable modules show a coloured frame while Mouse Mode is armed.
MIDI Routing from a DAW
To analyse MIDI that is already playing inside your DAW, you can route it to MPE Insight using a virtual MIDI port. No additional hardware is required.
-
1
Create a virtual MIDI port
Windows: download and install loopMIDI (free). Create a new port and give it a name, for example "MPE Insight In".
macOS: use the built-in IAC Driver, no additional software required. Open Audio MIDI Setup, choose Window → Show MIDI Studio, double-click IAC Driver and tick Device is online. Its bus then appears as a MIDI port everywhere.
-
2
Route your DAW to the virtual port
In your DAW, set the MIDI output of the relevant track or instrument to the virtual port you created.
-
3
Select it as input in MPE Insight
Open the MIDI device list in MPE Insight and activate the virtual port.
Make sure to disable MIDI Input for the virtual port in your DAW. If the DAW has MIDI Input monitoring active on the same port it is sending to, the signal will loop back into itself, causing a MIDI feedback storm that can freeze or crash software. Only the output of the DAW should be routed to the virtual port; MPE Insight reads from it without sending anything back.
MIDI Output
A dedicated output port with two independent send modes. Whatever you play yourself, with the mouse or the computer keyboard, goes out through the same ports without a switch of its own: see Playing without a controller.
MIDI Thru
Incoming MIDI signals are forwarded unmodified to the selected output port.
Demo Out
The built-in demo engine sends generated MPE events to the output port, useful for testing downstream devices.
Clock & BPM
One tempo pill in the toolbar shows the tempo that is really running, and where it comes from: MIDI while a host clock (0xF8) is driving, Int while the app's own internal clock is. Clicking it opens the source switch and the internal tempo.
Any control that turns cyan is locked to this same tempo, wherever it lives: FORGE's effect Sync buttons, the Sync toggle of the Conductor (FORGE's autonomous slider drift, described with that module), DRIFT's Arpeggiator Sync.
MIDI Clock events are included in recordings and embedded as Tempo meta-events in exported MIDI files, using the actual measured tempo, not a fixed 120 BPM placeholder. A steady host tempo settles to a single accurate tempo event, not a run of near-duplicate readings from USB/driver jitter.
The Internal Clock inside that pill is the app's one internal tempo source: DRIFT's arpeggiator, the Sync switches in FORGE (Conductor, Glitch, Strobe) and CASCADE's beat grid all read it. Follow MIDI Clock hands the tempo to a host whenever one is sending, and takes the last measured host tempo over when it stops, so a track that ran at 140 does not snap back to an old hand value. Internal only keeps your own tempo even while a host clock is running, for playing along to something without the host dragging the visuals with it. A padlock on the pill marks that state, and turning the tempo up there while a clock is running switches to it for you. While a clock is being ignored, its tempo stays readable in the popover, and Take over adopts it as your own value without handing the tempo back.
Modules
Keyboard
A piano display of 88, 61, 49 or 25 keys (set via Keyboard Range in Global Settings), showing all active notes in real time. Each active key is highlighted in the colour of its MPE channel. Pressure is shown as fill intensity, and a Pitch Bend ring around each key visualises the current deviation in cents.
Keyboard Play Mode: Click or touch any key to send real MPE notes out. Horizontal position controls Pitch Bend; vertical position controls Pressure (upward) or CC74 Timbre (downward).
Pixel Grid: An eighth style, a from-above LED grid in three layouts: Piano (a dotted key silhouette, black keys read darker at rest), Fingerboard (equal-width semitone columns, no key shapes) and Accordion (the chromatic button accordion's field: three rows, a minor third per step along a row, neighbouring rows a semitone apart, so an interval spans the same distance in every key and an octave is four columns). Two combinable switches, Glow Trail and Splash (fires above an adjustable velocity threshold), plus its own Density (LED count) and Pixel Size controls, separate from the global Size slider.
Settings: Eight visual designs (Classic, Glass, Neon, Minimal, Dark, Fingerboard, Motion, Pixel Grid) with per-design colours (Fingerboard stripe, Motion wave pair, Pixel Grid unlit/lit LED) · pressure colour mapping (Low → High or Static, with adjustable intensity) · Fill Level (pressure fills the key from the bottom up like a meter) · Hand split (a separate colour pair for the left hand below an adjustable split point) · Brightness Ring for CC74 (min / max colours or static, intensity and size) · Transparent BG. The bend ring around each key reads the instrument's own range automatically, see Bend range.
CASCADE · Note Rain
A piano-roll-style note-rain visualiser that sits above the Keyboard display. Three note sources feed the same canvas: Live MPE: notes are born at the strike line and travel away from it (rising or falling), pitch bend drifts each note sideways and channel pressure blends its colour; any .mid file played by the global 🎞 MIDI File player in the toolbar, arriving exactly like live input; and CASCADE's own Play a Picture, which turns a picture, a drawing or plain text into a note rain, no keys needed.
Play a Picture: Three tabs: Image (threshold, detail, invert, original colours, keep aspect, with an Auto button that tunes the threshold for you), Draw (a small sketch pad with colour palette) and Text (typed words become falling glyphs, case and line breaks are kept). Image and drawing pixels map to notes through a scale (Chromatic, Major, Minor, pentatonics, Blues, modes …), root note and tempo. ▶ Play bakes the source into CASCADE's own scrolling transport (play / pause / stop / seek / loop), and ⭳ Export .mid saves the generated notes as a Standard MIDI File, all notes on channel 1, nothing dropped even for dense text, ready for your DAW or synth.
Render modes: Eight independent layers, freely combinable, Bars (classic solid bars / ribbons), Particles (dissolve into a drifting particle cloud), Lightning (notes as crackling electric bolts), Code Rain (falling code-rain glyph columns), Plasma (breathing energy columns), Waveform (an oscilloscope trace whose wavelength follows pitch and amplitude follows pressure, CC74 adding harmonic bite), Vines (growing tendrils that thicken with pressure as leaves unfurl along the note) and Stars (constellations of star nodes that weave webs between chords and twinkle with pressure, with an adjustable star shape). Four Render-Mode sliders (Opacity · Roundness · Amount · Size) act on every active layer at once.
Settings: Flow direction (up / down) and speed · note gradient (driven by Pressure or Velocity) with CC74-timbre and glow colour · hand split (a separate gradient per hand from a split point) · note texture fills (noise, lines, diamond, glass, chrome, outline or a custom image) · pitch-bend shift, its bend range on Auto by default with fixed values available as a display zoom for making small bends legible (see Bend range) · octave gridlines · a beat and bar grid locked to the incoming MIDI clock (from a DAW or the MIDI File player, so you can see whether a note landed on the beat) · optional sustain pedal note length, where a pedalled note keeps drawing until the pedal lifts instead of ending with the key · impact effects on landing (glow flash, sparks, ripple, fountain, firework, flames, water geyser, rain, lightning, vortex), ten independent layers that combine as freely as the render modes do, with Amount and Size acting on every armed one at once, and an Own color switch that gives every armed layer one shared colour instead of the colour of the note that set it off · a glow bar along the strike edge with six motion styles (Aurora drift, Wave, Flames, Weed, Bubbles, Sparks) · atmosphere layers: background colour or image with Transparent BG, background FX (motes, aurora, nebula, fireflies, starfield, light rays), note trails (comet, stardust, ribbon, bubbles, embers) and keyboard fog · playful game modes (retro block grid, alien shooter) · post-effects such as bloom, god rays and smear.
PB / Mod
Displays the Master Pitch Bend and Mod Wheel from the MIDI Master Channel (channel 1). Two display modes: Classic (two vertical sliders) and Radial (circular dial). Both sliders are colour-configurable. This is the one display that never converts: the wheel shows the raw master pitch-bend position, so full deflection is full deflection whatever range the instrument reports (see Bend range).
Expression Overview
One module, five ways to see the same expression data. Expression Overview tracks up to 10 signal sources, by default Pitch Bend, CC74 Brightness, Velocity, Pressure and Release Velocity, each in its own freely chosen colour. The Mode selector switches between two time-based views (Lines, 3D Box) that plot every source over a configurable window, and three current-moment views (Radar, Landscape 3D, Rack) that show where each source sits right now. Radar and Landscape 3D were the separate "Expression Breakdown" module in earlier versions; they now live here as modes.
Lines draws a flat chart of the last 5-30 seconds (default 10): bipolar signals such as Pitch Bend are centred on a dashed zero line, unipolar ones grow from the bottom edge. 3D Box lifts the same history into a slowly swaying perspective box, time runs along the box, each source gets its own depth lane, and every signal leaves a glowing trajectory whose bright endpoint marks the live value.
Radar spans a spider mesh across the sources (at least 3): a filled polygon updates in real time, its colour mixed from the most active axes, and each axis label shows the signed value while the shape uses the magnitude.
Landscape 3D turns the same values into a static 3D terrain: every source owns a fixed anchor point on the mesh, and its live value raises a smooth mound there, Pitch Bend can also dig below the surface. Mounds widen as they grow and blend softly where they overlap, glowing peak dots carry each source's name and value, and a spectral height ramp colours valley to summit, with fast attack and slow release, so hits land instantly and fade gently. A slow camera sway adds parallax while the terrain itself stays put.
Rack drops the curves entirely and draws each source as the piece of studio gear you already read it by. A value you set gets a control, a value that happens gets a meter, and every row lets you overrule that: Auto, Knob, Meter or Bar, the bar new in this release, so a source you want to read at a glance can be a bar even where the automatic would have drawn a knob: Pitch Bend and CC10 Pan appear as knobs with a centre detent, resting straight up and swinging either way, while Pressure, Velocity, Release Velocity and both Aftertouches appear as channel-strip meters filling from the bottom, each with a peak mark that holds for a moment and then falls, so a single strike stays readable instead of flashing past. CC74, the Mod Wheel and any other CC are positions too, so they get knobs. The elements arrange themselves into a grid that fits the panel and drop their readouts, then their names, as the module gets smaller. Unlike Radar and Landscape 3D this mode works from a single source.
Pitch Bend always reads in real semitones (e.g. +2.00 st). With several channels bending at once the scale follows whichever one is contributing the largest swing, at the range that channel itself reported (see Bend range), so nothing has to be set by hand here.
Settings: Mode · sources (add / remove / recolour, up to 10, Radar and Landscape 3D need at least 3) · Time Window (5-30 s, Lines / 3D Box, greyed out in the current-moment modes) · Glow · Transparent BG · MIDI channel filter.
MIDI Stream Log
A real-time table of all incoming MIDI events (up to 250 entries, newest first). Columns: timestamp (with milliseconds) · message type · channel · note · value · raw hex bytes. Each message type is colour-coded, Note On green, Pitch Bend blue, CC orange, and so on. The most recent entry briefly flashes on arrival. The module's toolbar offers ⌫ Clear and ⭳ Export, which saves the visible rows as a .csv table in chronological order (oldest first, the opposite of the newest-first table on screen); both respect the module's MIDI channel filter (the master channel 1 always passes). Transparent BG is available here too.
Four views share the module, picked with the View menu at the top of the settings (the toolbar names the one that is showing). Events is that table. Notes is a voice ledger, Channels is a per-channel breakdown, and Stats is the numbers. Each Log instance remembers its own view, so two Logs side by side can show two different views of the same stream, each with its own channel filter; the view is part of a saved stand, like every other module setting. Eight presets come in pairs, one per view: the plain panel, and the same view as a chrome-less overlay floating over the visual modules. ⌫ Clear and ⭳ Export belong to Events and ↺ Reset belongs to Stats; each greys out on the views where it has nothing to do.
Message colours. Eight message types, one colour each, edited in the settings under Message Colours: click a swatch and pick, the way Expression Overview's sources work. One palette serves all four views, so recolouring Pitch Bend moves the Events rows, the Channels band, the Stats line and the ledger together. Each Log instance keeps its own palette and it travels with a saved stand. CC74 starts on the same orange as the other controllers, so nothing looks different until you decide the timbre axis deserves its own colour, which is one click. ↺ Reset colours puts the whole palette back.
Events, the detail line. Click any row and the strip below the table writes that one message out in full: the decoded fields and the raw bytes side by side. A pitch bend reads as its signed value, its 14-bit number, its normalised position and its deflection in semitones at the range that channel reported, so the number the app is drawing with is visible next to the bytes that produced it. The selection follows the message, not the row it was on, so it survives the table filling up around it. With Transparent BG on, the table stops taking clicks and the strip says so.
Notes, the voice ledger. One row per sounding voice, in the order the keys were struck: status, note, channel, velocity, pressure, bend in semitones, CC74 and a running duration. This is not a second reading of the wire, it is what the app believes: the same voice list Keyboard, Grand Staff, CASCADE and FORGE draw from, so a note that looks wrong on screen can be checked as a number here. A finished note stays for three seconds, greyed, with its release velocity if the controller sent one, which is the only way a staccato run is readable at all. Bend is written with two decimals, so a quarter-tone reads +0.50 and a sixteenth-tone is still distinct from it.
Channels. Sixteen rows, one per MIDI channel, always in channel order: a bar showing how much traffic that channel carried since the last reset, measured against the busiest channel, then what it is holding right now, note, bend, pressure and CC74. The bar is split into coloured bands, so its length says how much and its bands say of what: notes, pitch bend, pressure (channel and poly aftertouch together) and CC74, with everything else in a fifth, quiet band. On an MPE zone that is the whole picture at a glance, a channel carrying notes and little else looks nothing like one carrying a note under a wall of pressure. The colours are the same ones the Events table uses for those message types, and a key sits under the table. A channel that is quiet, or that the channel filter is holding back, is greyed rather than removed.
Stats. Two blocks, kept apart because they measure different things. Now is the live spread across everything sounding: how many notes, over which channels, and the lowest to highest note, velocity, pressure, bend and timbre among them. It carries the weight of the two, since it is the answer most of the time, and in silence it reads as empty rather than freezing on the last value. Since reset, set apart below it, is the running total: how many messages of each kind, split by type and colour-coded like the Events table, plus the spans each value has travelled, with bend given both in semitones and as the raw 14-bit pair. ↺ Reset zeroes those totals for this Log only; it is a separate account from Clear, which empties the Events rows.
Two things an instrument says about itself get their own line here, because they change how every module draws: Bend Range (RPN 0, see Bend range) and MPE Zone (the MPE Configuration Message). Many controllers announce both only when they power up or when their zone changes, so the line appears on connect rather than while you play, and this is the one place to check that it arrived at all.
Grand Staff
Four display modes share one engraving engine, switch with the Mode buttons at the top of the settings. Now shows only the currently held notes, Time lets played notes scroll across the staves like a timeline, Flow turns them into expressive MPE ribbons, and Weave leaves notation behind for a harmonic field.
Classic notation on treble and bass clef staves. All currently held notes are shown with accidentals matching the selected key signature. An optional Pitch Bend Hook draws a curved arc from each notehead, up for positive bend, down for negative, scaled to the bend depth. Chord detection recognises triads, 6th/7th chords, sus/add chords, altered dominants (♭9/♯9/♯11/♯5/♭13), quartal voicings, polychords and 9th/11th/13th extensions from the currently held notes and labels them lead-sheet style, including slash-chord inversions (e.g. "C/E"). Anything with a real 7th is named by construction rather than looked up in a list, so an ordinary jazz voicing that no table anticipated still gets its proper name: C-E-B♭-A♭-D♭-F♯ reads C7♭9♯11♭13.
Time: the scrolling take on notation (the former Note Timeline module lives on here): every played note travels across the staves, so phrases stay readable after the moment has passed. Noteheads keep the pressure colour mapping (Low → High, or Static), an optional CC74 / Timbre colour blends in as a note brightens, and Hand split gives the left hand its own colour pair below a configurable split point.
Flow, notation becomes ribbons: each note draws a band at its pitch whose length is the duration, whose thickness follows velocity and pressure, and whose curve traces the pitch bend. True legato merges into one continuous line, an adaptive phrase break starts a new ribbon when a silence is long relative to your playing speed, and a voice-split threshold keeps two-handed playing in separate voices. Colours per voice (each melodic line keeps its colour) or by scale degree, with eight palettes from Spectrum to Beige, plus a soft glow halo and a gap bridge across small non-legato gaps.
Weave, harmony as a field: the staves disappear and pitch becomes a position on an interval field instead of a height on a line. One step to the right is a fifth, the two diagonals are the major and the minor third. Because the directions are fixed intervals, a chord turns into a shape: every major triad is the same upward triangle and every minor triad the same downward one, in every key, so quality reads before a single note has been named. Transposing moves that shape rather than redrawing it, and voice leading becomes distance, a cadence stays in one small area while a modulation visibly walks away from it. Each pitch class recurs across the field, and Field width decides how much of that repetition you see: fully zoomed in there is exactly one figure, centred, and pulling back scales the copies in one at a time until the whole field is a wallpaper of the same shape. Pitch bend climbs the field vertically, its trail as long as the interval it travels, whole octaves folded away (a node is a pitch class, so a bend of exactly an octave has arrived back where it started and a slow full sweep breathes out and back once per octave). An adjustable afterglow keeps released chords burning so the harmonic path of a whole phrase stays visible. Two looks share all of it. Instrument draws the field the way an instrument face is drawn: the lattice itself in hairlines, hard-edged marks lit from a single direction, the lowest note carrying a collar so inversions read on a field that has no octaves, colour reserved for what sounds right now while the recent past drains toward grey, and the chord name set small on the panel's own margin. Glow keeps the softer luminous rendering. Key gravity weighs the resting field toward the current key: at zero every position weighs the same, turned up the key's own notes grow and brighten, foreign ones sink away and the tonic becomes a marked anchor. Field width sets how much of the field fits across the panel, counted in steps, so the same setting means the same thing in a narrow tile and a wide one. Labels appear only on what actually sounds, as scale degrees (1, ♭3, 5) or as note names, and step aside once the field gets too dense to read them. They are spelled, not looked up: the route a note took across the field is a spelling, so a raised fifth and a flattened sixth stay apart even though they are the same key, and the label can never contradict the chord symbol above it.
Settings: Mode (Now / Time / Flow / Weave) · key signature (all major and minor keys) · note name labels · Pitch Bend Hook · chord detection with label colour · note colours (pressure Low / High, Static, Hand split with own colour pair and split point) · CC74 / Timbre colour (Time mode) · Flow: phrase break, voice split, gap bridge, colour mode (Voice / Scale (key)) and palette, halo · Weave: look (Instrument / Glow), field width, afterglow, key gravity, triad fill, labels · Glow · Transparent BG · MIDI channel filter.
Grand Staff's engraving also powers the lead-sheet export: record a take and render it as a complete paginated notation sheet, chord symbols included, saved as one PNG.
Aura
A generative real-time visualiser that maps MPE expression data to one of twenty-four rendering styles, grouped into four families, Elements, Rings & Radial, Flow & Organic and Scenes. In every style, size, width and twist are independently routed to the MPE dimension of your choice. A Scenes highlight is Orrery: notes orbit a central ring by pitch class, with octaves as orbital depth, pressure, bend and timbre animate each note's glow, size and trail, and the rotation direction is switchable.
Styles
Elements
Rings & Radial
Flow & Organic
Scenes
Elements are GPU shader fields: Silk Flames is a flowing WebGL flame-silk field that ignites per note and reacts to pitch, and Photo Swarm turns a photo of your own into a GPU particle cloud that scatters per pitch column and heals back (with no photo it runs neutral in the background colour). In Flow & Organic, Filament is the one style that keeps what you played: a note plants a glowing seed at its pitch, and for exactly as long as you hold it a thread grows out of that seed, wanders, forks and fuses with whatever it touches, so a phrase grows into a single lit net instead of a scatter of shapes. The whole structure travels the entire time, which is why the frame never runs out of room: new growth appears at one end, the other thins into out-of-focus points and is gone. Base Speed steers that journey and is the character switch of the style: forward the net recedes and dissolves in the distance, backward it comes at you and dissolves as it sweeps past, at zero it stands still and simply piles up. Strike a note a good interval away from what is already standing and it starts its own colony instead of joining the old one, so wide leaps build separate bodies. Attack and Decay are lengths here rather than brightnesses: a long Attack has the thread creep out of its seed and pick up speed, a long Decay has it keep inching onward after you let go. The Width source is the master ignition, so pushing CC74 up lights every node that is still standing and the whole net comes back out of the dark, not just the growing tips. And Note Rotation winds the body around instead of nudging it: low notes turn it one way, high notes the other, and it stays where you turned it. In Scenes, Tonewheel is a pitch-clock dial where notes ignite on the ring and drift back into a depth tunnel, and Glass Spiral winds the block field into a spiral seen from an elevated camera: low notes stand on the wide outer rim, high notes in the tight core, and every slab is lit glass.
Signal sources (per parameter)
Each of the three dynamic parameters (Size · Width · Twist) can be independently routed to: Pressure · CC74 Timbre · Velocity · or Pitch Bend (bipolar). Glow is a fixed amount, and Attack / Decay shape how fast every routed parameter rises and falls. Wherever a style places a note on a key axis, its Pitch Bend Range is Auto by default, with fixed values available as a display zoom (see Bend range).
Aura Presets
Two built-in presets for every style, with the MPE Insight signature at the top of the list. Each is a starting point rather than a finished look: change anything and save your own alongside them. The pair belonging to a style differs in more than colour. Presets set the style, colour pair, segment count, envelope, signal routing, and background colour simultaneously, so a handful deliberately drive a knob from a different signal where that fits the picture better, for example a strike-driven look running Size from Velocity, which also keeps it working on a keyboard without aftertouch. Custom configurations go into the per-instance Aura Snapshot list, which has no upper limit and simply starts with five empty rows.
FORGE · Depth Shader
A live WebGL shader driven by the same MPE data every other module reads. Feed it an image or video, the webcam, or the live picture of other modules, the shader reacts to your playing in real time: pitch bend, pressure and CC74 shift, warp and animate the picture. FORGE runs as a single instance (one GL context, one source chain).
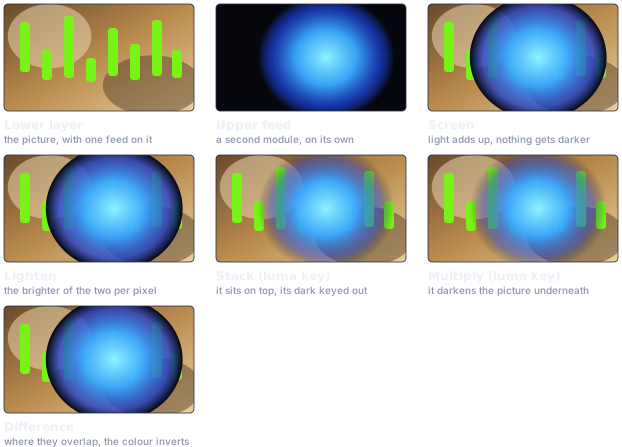
Sources: Drop an image or video anywhere on the module, or pick a source in the settings: a file, the webcam (with camera selection), or the Module Feed: CASCADE, AURA, Grand Staff, Expression and Keyboard can each be routed through the FORGE effect chain, alone or several at once. Multiple feeds composite with a selectable Feed Blend: Screen and Lighten add light, Stack and Multiply luma-key each layer (dark areas turn transparent), Difference inverts overlaps. While a module feeds FORGE, its own tile hides itself, and a file or the webcam can sit underneath the whole feed as a Base Layer.
Real depth: On first load FORGE uses AI to estimate a depth map of the image (Depth Anything V2, Apache-2.0) and builds real parallax and relief from it, instead of a flat filter. If the model or a backend is unavailable (e.g. fully offline), the shader falls back automatically to a luminance pseudo-depth, so the module always works, just with flatter parallax when offline.
Effects: Parallax · normal-map relief · heat shimmer · flow · kaleidoscope · Infinity Spiral · glitch · mosaic · chromatic aberration · False Color palettes · point cloud · strobe · feedback trails · Retro Pixel VHS · cell screens · zoom · rotation · tunnel warp · camera shake, each effect independently switchable between off, MPE-driven and a constant value.
Global & mapping: Sensitivity shapes how your pressure reads: to the left you have to lean in before much happens, to the right a light touch already carries. Full press always arrives at full, whatever it is set to. Every disc effect carries its own Size slider, the radius of the disc it plays inside. Pitch → Position decides where a note lands on the image: Circle, Horizontal, Vertical, Center (the whole keyboard on one middle disc), Random (a fixed scatter, one place per key), Color key (nearest matching colour) or Hue key. The 88 / 12 pair beside it sets how finely that mapping reads the keyboard: 88 gives every key its own place, 12 lets all octaves share one, so a note name always lands in the same spot however you voice it. Every effect can also leave that global choice and run its own mapping, from the small menu on its own OFF / MPE / CONST button. A Depth Preview toggle shows the estimated depth-map thumbnail.
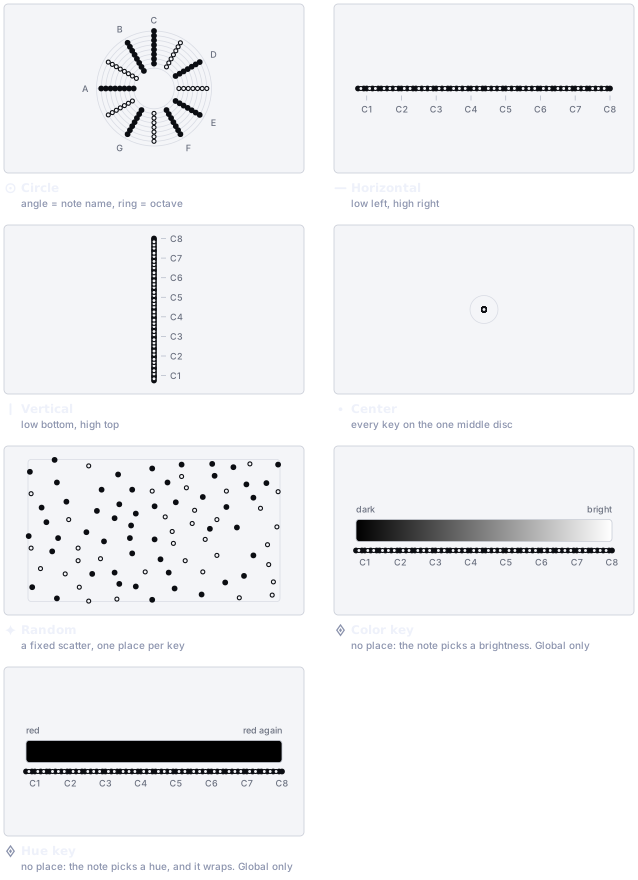
The symbol beside each title is the face an effect's own button wears for that mapping, so the chart and the panel say the same thing in the same signs. OFF and CONST say themselves; in MPE the button carries the chosen mapping's symbol, so one glance says whether that effect follows the global Pitch to Position choice or has left it for one of its own. Rings and Splash are the one pair without a Constant entry, because a gesture has no constant twin. Color key and Hue key are the single gap in the scheme, and the chart marks them: they carry the Global symbol rather than one of their own, because they exist only globally. An effect that follows Global therefore keeps showing Global whether the mapping is a place on the picture or a value in it, and the dropdown above the frame is where you read which. The last chapter is the 88 / 12 pair: on 12 the places collapse onto twelve, one per note name, and every octave of the same note lands on the same spot.
Envelopes: Pressure, Pitch and CC74 each have their own Attack and Release times, so the shader can snap instantly or ease in and fade out smoothly after every note, from tight, percussive reactions to slow, breathing swells.
Effect parameters: Each effect has its own toggle, OFF, MPE (driven by your playing inside the Size disc at the note's pitch) or CONST (a constant value over the whole image), plus its own sliders: its own Size (the disc radius around each note), Parallax (Depth, Motion, Drift), Heat shimmer, Flow and Chroma (Strength, Motion), Kaleidoscope (Segments, Motion), Infinity Spiral (Twist, Rings, Motion), Glitch (Strength, Rate, Density, each strike tears inside its note's disc), Mosaic (Blocks, pressure carries the block size from the start ring to the slider, so it can build up or heal away), False Color (Mix, Solarize, Hue, pitch bend can spin the palette live), Normal Light (Strength, colour, plus a diffuse Fill and its own Motion and Orbit), Strobe (Intensity, Speed, colour, plus a Backlight mode that fires the God-Ray pass instead of a flat flash) and Feedback Trails (Decay). Every Motion slider is a true time control: at zero the movement stops and the effect settles into one defined resting state, so the same slider position always gives the same picture, and where the two directions look different (Parallax, Normal Light, Heat, Flow, Kaleidoscope, Infinity Spiral, the Ripple, the VHS tracking bar) the slider runs both ways, left of centre playing the same movement backwards.
Point Cloud: A second render path, WebGL2 only: instead of the flat picture, FORGE plots a grid of points across the image and pushes each one toward or away from the camera by the depth map, so the Virtual Camera flies through a real point cloud instead of a flat plane. Shape switches between hard Dots, soft Splats and Glyphs, Size sets how large each point is, Density thins or fills the grid, and Depth sets how strongly the depth map pushes points out. In Glyphs mode each point stamps a character instead of a dot, picked from a ramp so that brighter points carry denser characters, kept in the point's own colour, for a live ASCII look you can fly through. The character set is a field you can edit, and the ramp re-sorts itself by density from whatever you type. In MPE mode, played notes push the points inside their disc toward the camera: presence brings them in and lets them fall back on release, pressure holds them out further the harder you press, slide opens the cone wider, and pitch bend moves it sideways. Under a global Color or Hue mapping the cloud selects its points by brightness or by hue instead of by place, exactly as the flat effect rows do. CONST mode runs the camera and depth alone, with no note pushing anything. The Depth of Field and Motion Blur post passes and the camera's own Relief slider are not available while Point Cloud is on (their rows grey out): they read scene brightness as distance, and the cloud already carries its own real depth. Camera Ground tilt, Heading and Lens distortion all work with it. Spin turns the whole cloud about its own centre on a free axis: Speed sets rate and direction, Axis slides from a vertical turntable axis through the diagonals to a horizontal tumble, and Lean tips that axis out of the picture plane toward you until the cloud spins about its own line of sight. In MPE mode the spin winds while you play and settles back upright in silence; CONST turns steadily. Point Cloud has its own section in the panel now.
Virtual Camera: Using the AI depth map, the Virtual Camera moves a real 3D camera through the image instead of applying a flat filter. Relief sets how strongly depth separates near from far. Ground lays the image down into a plane that recedes to a horizon, so parallel lines converge and near content really is larger than far; with it, Depth of Field and Fog stop reading brightness and start reading actual distance. Heading turns that ground under the camera, letting content run diagonally into the distance. The rest of the rig is grouped by what it does. Position moves the camera itself: Truck X/Y slide it sideways and up, Dolly drives it toward or away. View turns it on the spot: Yaw left and right, Tilt up and down, Roll tipping the horizon. Optics holds FOV (telephoto ↔ wide) and Lens (pincushion ↔ barrel/fisheye), and camera-motion Blur sits below. The distinction between the two groups is worth knowing, because it is the one thing that makes these sliders feel duplicated. Moving the camera and turning it only look different when there is depth in the picture: a real move shifts near content further than far content, which is parallax, while a turn shifts everything equally. With Relief and Ground both at 0 the image has no near and far at all, so Truck X and Yaw genuinely produce the same result, and so do Truck Y and a gentle Tilt. Raise Relief or lay the plane down with Ground, and they separate immediately. Likewise Truck Y against Dolly: one keeps the distance and changes the angle you look down at, the other keeps the angle and changes the distance. Three different rotations exist, and they are easy to mix up. Roll tips the camera head, so the horizon tilts with it. Heading turns the ground plane itself, so the horizon stays level and the content swings around underneath. Spin, over in the Whole Frame group among the Distort FX, is not a camera at all: it rotates the finished picture around its centre like a turntable. Move Amt sets how strongly the chosen Move preset plays on top of your framing. How far your playing moves the camera is not a separate number: it is the journey on each row, from the small start ring where it begins to the handle where it ends, so every axis says its own reach and you can read it off the panel. Reset Pose returns the framing to neutral, Ground and Heading included. With the Conductor running it keeps drifting those two on from there, which is what that target is for: close the range rings on the Ground and Heading sliders if you want the floor to stay flat. A cinematic DoF post-pass adds bokeh blur off the focal plane, its Focus slider is auto in the centre (focus follows your playing), far to the left, near to the right, and Fog fades distant content into atmosphere; both work in every camera mode. ● REC records up to 60 seconds of your own slider moves, Ground and Heading included, as a seamlessly looping Custom move preset. While a take is running the Conductor lets go of the camera and its bands go quiet, so the recording holds your move rather than its drift; it picks the camera back up the moment you stop.
Virtual Camera move presets: The Move dropdown offers around twenty cinematic camera paths in two groups. Fly in & home presets (Slow Push In, Orbit, Drift, Handheld, Crane, Dolly Zoom, Smash Zoom, Free Fall, Whip Pan, Quake) perform the move while you play and fly the camera back home on release. Continuous presets (Figure-8 Glide, Carousel, Endless Wander, Pendulum, Pull & Repel, Corkscrew Drill, Vortex Pull, Surge, Slingshot, Kite) wind forward like a loop while you play, release freezes the camera in place, and the next note continues the move from there, and the manual sliders below stay live as a trim on top of the preset. A move you recorded yourself always plays back at the tempo you recorded it.
Camera & post-process: CC74 Rings is what the slide axis does to the picture: lean into CC74 and the frame is pulled toward the note you are playing, with waves running outward on that pull. One bipolar slider carries the whole effect, and its two sides are two different pictures: to the right it pulls in and the waves run out, to the left it pushes away and they run in, and the centre is off. Splash is the strike's own ring in the picture: every note you play sends one wavefront out from its place, shoving the picture aside as it crosses and thinning as it grows. Strength sets how hard it shoves, Speed how fast it travels, and both reach a real zero. It is MPE only, because a splash needs something to throw it, and once thrown a wavefront always completes its journey: letting the key go, or playing on top, never cuts it short. These rings are drawn in the image; the rings on the sliders themselves are a different thing entirely, see Conductor and Start point below. Simpler whole-frame transforms live with the Distort FX, in a group called Whole Frame: Zoom, Spin (speed and direction, a turntable rotation of the finished frame rather than a camera move), Tunnel warp and Shake. Shake is played, not looped: every strike throws the frame off centre and a spring brings it back, low notes throwing it left and high notes right, and the harder you strike the further it goes. Strength sets the weight of a hit, Motion how much movement each one releases, from a single short nudge up to a long ring-out. Play nothing and the picture stands perfectly still, unless you set its start ring away from zero, in which case that is where it rests and a gentle tremble carries on by itself (its CONST mode keeps a steady idle tremble too, for a look that runs without playing). They bend the finished picture without a camera behind them, which is why they sit with the other distortions rather than with the Virtual Camera. Four post-process passes run last, on the finished frame: Bloom (Threshold, Intensity, Radius) blooms the bright areas, God Rays (Intensity, Length, Decay) casts volumetric light shafts, and Retro Pixel VHS puts the finished picture through an analog tape and CRT chain: Scanlines with a rolling tracking bar whose Roll slider sets its speed and direction, Dot Glow (the image resolves into a grid of glowing phosphor points), Chroma Tear (RGB offset, in MPE mode every strike bursts a harder tear), Grain with its own Grain Speed, and a Duotone tint with its own colour. Cells breaks the finished frame into a grid and redraws each cell by its own brightness, in one of three looks: ASCII stamps a character whose density follows the brightness, in the cell's own colour, Halftone lays down a rotated dot screen whose dots grow with the brightness, and Dither steps the frame down to a few colour levels in an ordered dot pattern. Cell Size sets how coarse the grid is and Contrast shapes the brightness ramp, and like every pass it runs off, at a constant value, or answering your playing, where harder playing breaks the picture further into cells. Every FORGE setup can be stored in the module's preset and snapshot slots, and FORGE respects the same MIDI channel filter as the other modules.
Living World: The image grows a world of its own, every style draws its palette and material from the source picture instead of a canned pattern. Four styles: Organic Growth (a grown reaction-diffusion culture; your playing seeds it at the note's position), Fractal Tunnel (an enclosed corridor ride), Fractal Open Space (free flight through floating folded formations; Density sets how many cells hold one) and Ink Bloom (an amber macro fluid-art blob that is its own light source). Pattern, Flow, Growth and Blend shape the behaviour, and ↺ Reseed World restarts the world from the current image.
Conductor: Autonomous slow drift on top of your sliders, so the look keeps living between notes. Switch it on and every slider it can reach grows a pair of range rings, one for each end of the range that knob may drift in. The panel has just two marks and they read the same everywhere: an outer range ring is a point you set, the green dot is the value right now. Closed, the two rings sit on the value as one, with the dot inside it, so a dot in its ring means the image is on your handle and a dot anywhere else means something else is moving it: a Move preset, or the play envelope on a camera in MPE mode. Drag the left ring to move the value as always; pull the right one outwards and the pair opens: the groove between them is the range, and the green line inside it shows what the drift can reach at this moment. Once open, either ring sets the reach and the line itself moves the value. Pull a ring back onto the value, or double-click one, and the pair closes again. Where a range runs into the end of its travel it slides inwards instead of getting narrower, so a knob at the very bottom of its slider still drifts its full width. The range always sits around your own value, so nothing jumps when the drift settles: at rest the picture is exactly what your sliders say. Intensity sets every open range at once, Cycle sets the pace, from a lazy ~5-minute sweep down to 0.4 s (the readout switches to BPM at musical rates). Its Sync button hands that pace to the transport tempo instead: the same slider then snaps to musical divisions, 1/16 up to 4 bars, and the readout names the division and the tempo it is riding. Or hand the timing to Silence: the drift holds still while you play and re-rolls in every pause. Because the drift breathes with your playing energy, the band widens as you dig in and settles back in the rests, and the live tick on the slider shows what is being rendered right now. The whole Virtual Camera is included: position, view, optics, Ground and Heading all take a range, so the Conductor can operate the camera the way it operates an effect. On a camera in MPE mode every row starts on its own handle, so the framing you dial in is the framing you see, in silence and while you play; pull a ring off the handle and that axis becomes a journey your playing travels, drift included. CONST mode drifts on its own. The Conductor drifts camera values, never the camera PATH: which move runs is the Move dropdown's answer alone.
Start point (MPE): In MPE mode a slider is the destination and your playing performs the trip to it. That trip begins at the parameter's neutral, which is why playing can only ever add a look, never clear one. It does not have to. Move the pointer over a camera, Bloom, God Rays, Living World, Glitch Strength, Strobe Intensity, Hue, Mosaic Blocks, Zoom Speed, Shake Strength, Tunnel Warp or Point Cloud Spin and Axis row in MPE mode and the small start ring appears where the journey begins. Drag it anywhere on the travel, including past the slider's own handle, and the move runs the other way: start wide and play your way in, start fogged and clear the air as you dig in, hold the camera off centre and let a phrase bring it home. A groove under the track draws the trip and the green bar inside it fills as you play, so you can see how far your playing is actually getting. Mosaic is the one row where every note travels its own trip inside its own disc, so a soft note stays blocky while a hard one right beside it comes clean; its bar reads the note pressing hardest. Double-click the start ring to hand the start back to the neutral. With the Conductor's range rings open on the same knob, its drift is capped to the stretch you drew, so every phrase reaches a different distance along the trip and none of them leaves it.
A row can carry two of them, and each one is undone the same way: point at the ring you want back and double-click that ring. A double-click next to it, on the track or on the slider's handle, does nothing.
Big ring pair (the Conductor's range rings): double-click either ring and the range closes. The two rings sit on your value as one again and that knob stops drifting.
Small ring (the MPE start ring): double-click it and the journey is handed back. The trip starts at the neutral again, which on the direct camera rows is the slider's own handle, so the small ring settles back onto it.
Where the small ring sits on the handle it takes the press, so move the value from anywhere else on the track and the ring comes along by itself.
DRIFT · MPE Processor
DRIFT is a live MPE processor that sits between your controller and your synth. It turns an ordinary MIDI keyboard into an expressive MPE instrument: one note per key goes in, a randomized, humanized MPE stream comes out, spread across the member channels with its own pressure, pitch and timbre motion per note. Every module, and every synth downstream, then reacts as if the part had been played on an expressive controller. While switched on, DRIFT replaces plain MIDI Thru on the enabled outputs. The master Intensity knob scales every randomization at once. Two modes decide how it reacts: Independent keeps the randomization running constantly, regardless of how you play, while Follow scales it with your own expression (pressure, pitch bend, CC74), subtle when you play plainly, wide when you dig in. A plain, non-MPE keyboard sends no such expression, so Follow stays near its minimum there and Independent is the mode to use. Selecting a DRIFT preset also sets the ⏻ power switch: presets meant to be heard arm DRIFT, all others switch it off, so the switch always matches the picked entry.
Modulation: Four independent per-voice LFOs, one per MPE dimension, Pitch, Timbre (CC74), Pressure and Pan (CC10), each with its own shape, depth and rate, and its own colour in the voice-lane display. Eight shapes are available: Drift (organic), Sine, Triangle, Saw Up, Saw Down, Square, S&H Random and Static (per note). Because every voice runs its own LFO phase, MPE's 15 member channels never move in lockstep, giving a chorused, organic feel even from a single sustained note. Pitch depth is in cents, up to 200 of them, so two full semitones; the others are a percentage. On a plain keyboard DRIFT generates pressure and timbre from nothing; on an MPE controller it layers on top of what you already send. All depths scale with the master Intensity.
Notes: On top of the modulation, DRIFT can generate whole new notes. Octave Layers stack octave copies above and/or below every played note, each its own MPE voice with its own drift and a settable relative velocity, but each layer costs one of the 15 member channels per note. Chord Machine turns a single key into a full chord: the played note becomes the root and each interval gets its own voice (also with its own relative velocity). Scale Lock snaps every generated note into a chosen key and scale, so the Chord Machine becomes diatonic and Note Spread and Bend Quantize follow the same scale. Note Spread displaces each played note to a nearby degree for instant width (snapped to the scale when Scale Lock is on), with a Max displacement control. Bend Quantize pulls continuous glides onto scale notes (100% = hard snap, lower keeps some of the slide) while leaving plain held notes untouched. Humanize adds subtle per-hit velocity variation and a few milliseconds of random timing so no two notes are identical.
Arpeggiator: With the ARP engaged, held keys become a step pattern instead of sounding directly, and every step still runs through the full randomization chain (drift, pan, spread, even the Chord Machine for rhythmic chords). Direction can be Up, Down, Up & Down, Random, As Played or Chord, extended over 1-4 octaves. Chord is a distribution rather than a direction: it plays the whole held chord on every step instead of one note at a time, and because each step builds new voices, every hit re-rolls its own detune, LFO phase, velocity and timing offset, so the same chord breathes differently on every beat. There the octave range rotates the chord one octave per step instead of stacking it, keeping the voice count flat; every note still takes one of the 15 MPE channels, so a wide chord together with the Chord Machine can run past them. Free runs it at the Internal Clock tempo set in the toolbar's tempo pill; Sync locks the divisions (1/4, 1/8, 1/8T …) to the transport clock, MIDI Clock when one is present, otherwise the Internal Clock. Gate sets note length as a fraction of the step; Latch keeps the pattern playing after you release the keys, with the next key press starting a new chord.
MPE Output: DRIFT sends to the enabled MIDI outputs, and what listens there has to be an MPE-capable receiver: a synth, or a DAW track switched to MPE mode. Send MPE Setup transmits the MPE Configuration Message (15 member channels) plus the pitch-bend range to those outputs, it is sent automatically every time DRIFT is switched on, and the range must match what the receiving synth uses on its member channels (MPE standard is 48), or the drift depth will be wrong. The 👁 In / Out monitor decides what every visual module displays while DRIFT is active: the raw input you play, or DRIFT's processed output: the actual randomized MPE stream the synth receives, including chord voices, arp steps and channel allocation. The monitor changes what you see, not what is sent. With output monitoring, the toolbar's ● Rec captures DRIFT's output instead of the input, so you can export the humanized, arpeggiated or chorded MPE performance as a .mid file for your DAW. DRIFT also has its own glow and Transparent BG for the voice-lane visualiser.
Visuals only: DRIFT engages as soon as a MIDI output is enabled, or, with the monitor set to 👁 Out, entirely without one: the status then reads visuals only · no MIDI out, and DRIFT re-voices a plain keyboard or a single-channel DAW track across the member channels purely for the on-screen modules, no synth required. While it runs, thin ghost ticks on the sliders show what is effectively being sent: the toolbar Intensity tick appears in Follow mode (how far your expression scales the randomization below its maximum), and each modulation depth slider carries a tick in its parameter colour.
Layout System
The interface is built on a 12-column CSS grid. Every module can be freely repositioned and resized.
- ↕Drag to move
Grab a module by its title bar, hold the left mouse button and drop it anywhere on the grid. It snaps to the nearest cell and stays where you let go, including on top of another module. The four arrows in the title bar nudge it one cell at a time, by the same rule.
- ⇄Shift-drag to swap
Hold Shift while grabbing the title bar and the module trades places with whatever you release it over, taking that slot's size as well. The dragged module stays put during the gesture and the target is ringed, so you always see which two are about to trade.
- ⤡Resize
Drag any of the eight resize handles (edges and corners) to change a module's size and position on the grid.
- ×Show / Hide
Close any module via its title bar button or the module manager. Reopen it from the module manager panel.
- +Multiple instances
Every module type except FORGE and DRIFT can be opened multiple times simultaneously, each instance has its own settings, channel filter, and snapshot slots. Those two run as single instances (FORGE keeps one GL context, DRIFT would otherwise send every note twice).
The Reset Layout button restores the default arrangement of all nine modules.
The module manager (☰) also offers Place All (add every module not currently on the grid), Randomize (shuffle the visible modules into a random arrangement) and Clear All (remove every module from the grid).
Keyboard Range: Global Settings lets you switch the on-screen key range (88 / 61 / 49 / 25 keys) everywhere pitch maps to position: Keyboard, Cascade including its Play a Picture source, Aura and FORGE, whose Pitch to Position mapping spans exactly this range. Typing Keys is clamped to it too, so its two manuals can never reach past the top key. Grand Staff is the exception, notation puts a pitch on a staff rather than on a keyboard. Smaller ranges mean bigger keys, useful on small screens or with a smaller controller.
Sustain Pedal: Global Settings also describes the pedal itself, because pedal jacks on many instruments can be configured. Sends picks which controller number the pedal arrives on (CC64 damper, CC11 expression, CC7 volume, or no pedal at all). Type says whether it is a switch or a continuous pedal with real half-pedal travel; left on Auto, MPE Insight works this out from your playing, since only a continuous pedal ever sends a value between its two ends. Invert is for a normally closed pedal that would otherwise read as permanently held down. The defaults suit an ordinary sustain switch, so most setups need nothing here.
Channel Filtering
Global channel filter: Restricts all modules to selected MPE Member Channels (MIDI channels 2-16). The Master Channel (channel 1) is always excluded from filtering as it carries global messages.
Per-module filter: Each filterable module instance can either follow the global filter or set its own independent channel selection.
Filterable modules: Cascade · Keyboard · Aura · Forge · Grand Staff · Expression Overview · MIDI Stream Log · DRIFT.
Snapshots & Undo
Snapshots save named states to browser local storage and can be exported/imported as JSON files.
Global Snapshots (unlimited playlist)
Saves the complete app state: all module settings, layout, theme, and channel filters. No longer a fixed 10 slots, it's a freely growable list you reorder by dragging the ribbed handle in each row (always at least 5 rows shown). Export the whole list at once as a "playlist" file, e.g. to build a setlist for a gig and move it to another computer, or click rows to mark them and export just those.
Starting from nothing: ⊘ All Off
CASCADE, AURA and FORGE each carry an ⊘ All Off button that switches every drawn layer off at once, so you can build a look from an empty frame instead of switching ten things off by hand. What it spares is deliberate: your song, your picture and the Transparent BG setting stay as they are, because those are the frame you are working in rather than part of the look. AURA lands on its MPE Insight signature rather than on bare factory values, so the button hands back a picture instead of an empty field.
Selecting rows, and exporting only those
Clicking a row in any snapshot list marks it, and clicking more rows adds to the selection. While something is marked, Export and Delete work on the selection alone instead of the whole list, so a set of stands for one song can leave as a single file without taking the rest of the library with it. Importing such a file adds its entries to the list rather than replacing it. Clicking a marked row again unmarks it, and the button labels follow what is selected. This works in every module list, not only in the Global Snapshots.
Aura Snapshots (unlimited list)
Saves only Aura configuration and its channel filter override.
Module Snapshots (unlimited list each)
Per-instance snapshots for every open module. Settings only, not layout position.
Undo (20 steps)
Reverts destructive actions: Reset, Randomize, Preset load, Snapshot load, module removal. Ctrl+Z / Cmd+Z. Each step goes back to the full state from just before that action, so tweaks made after it are reverted too. There is no Redo.
Every snapshot list supports: Save · Load · Delete, a ribbed drag handle to reorder (the list scrolls along when you drag past its edge), plus one Export and one Import button below the list. Export writes the whole list as a single .json file; click one or more rows first (they get a dashed mark) and it exports just those instead, after listing them. Pressing a marked row's ✕ likewise deletes the whole selection, after listing it; ✕ on an unmarked row deletes only that row. Import reads any snapshot file back, a whole list, a marked selection, or a single snapshot, and adds what it finds to the end of the list, so nothing you already saved is overwritten. Live switching through a list with MIDI Learn Prev/Next stays a Global Snapshots feature.
A Global Snapshot also stores whether DRIFT is switched on. Loading a snapshot, stepping through the list with MIDI Learn, and Undo all restore that switch together with the rest of the state, so a song saved with DRIFT armed comes back armed. The autosaved state at app start never does this: the app always boots with DRIFT off, and one explicit switch-on per session stays the rule.
Every module's settings panel opens on three tabs: Controls holds the module's own settings, Library holds its Presets and Snapshots, and Channels holds its MIDI channel filter. PB/Mod has no member-channel filter and therefore shows two. The panel opens on Controls every time, so the gear always shows the same thing first. The global menu (☰) follows the same split across three tabs: Modules, Global, and Library.
Inside a Library the preset picker sits on top and the snapshot list below it. Only the list scrolls: Export/Import (and the global list's Prev/Next Learn) stay pinned at the bottom, so they remain reachable however long the list grows.
MIDI Learn (Live Snapshot Switching)
Step through the Global Snapshots list hands-free during a performance, learn a trigger once, then just play it to flip to the next or previous entry, no mouse required. Found in the Global panel under Presets & Snapshots → Snapshots → "Live Snapshot Switching (MIDI Learn)".
Two learnable triggers
"◀ Prev" and "Next ▶". Click Learn, then send a Note, a Control Change (e.g. a footswitch/pedal), or a Program Change, whichever your controller sends is captured automatically.
Channel 1 only, by design
Triggers are only ever read on MIDI Channel 1, the MPE "Manager" channel. Per the MPE spec, member notes never arrive there, only global values and pedal/footswitch CCs, so a learned trigger can never collide with real performance data on Channels 2-16, no matter how wide the MPE zone.
Safe with DRIFT
A learned trigger is a control message, not music: with DRIFT armed it still steps the snapshots, but it is swallowed before the processor, so it never fires a phantom member-channel note and never leaks a CC or Program Change to your synth. Triggers also keep working regardless of the 👁 In / Out monitor setting. Stepping snapshots can also arm or disarm DRIFT itself, exactly as saved.
Program Change syncs the whole rig
Learning a Program Change lets a single footswitch or workstation patch-change message switch MPE Insight's snapshot in lockstep with every other synth in a live rig, using the same message everything else already reacts to.
Collision protection
The same trigger can't mean both Prev and Next. If a just-sent trigger is already bound to the other direction, it's rejected with a brief "Already used by…" hint and learning stays active so you can just send a different one.
Only the "on"/press edge triggers a switch (Note On with velocity, CC/pedal value > 0), a pedal's release doesn't immediately fire it again. Triggers are saved locally and persist across restarts; clear them individually from the same panel.
Conductor control
The same mechanism drives the FORGE Conductor, from three more learn slots inside the Conductor block of the FORGE panel: Enable, Range and Cycle. Still Channel 1 only, still exclusive with the Global Snapshot triggers above, a pedal or CC can't mean two things at once.
Enable is a toggle
Learn a Note, CC or Program Change; only the press/on edge switches the Conductor on and off, same as the Snapshot triggers.
Range and Cycle are faders
These two only accept a CC, and every value is applied continuously, a fader pulled all the way down really does set 0%. Pick a CC your rig does not already use for something else.
CC64 stays off limits here too, it's the sustain pedal. Some DAWs send a Program Change on transport stop/start; a learned PC on Enable then flips the Conductor on every stop, same known caveat as the Snapshot triggers.
Recording
Click the Record button in the toolbar to start capturing all incoming MIDI events with sub-millisecond timestamps. An animated button and stopwatch display indicate active recording.
The recording captures channel messages and MIDI Clock pulses (0xF8) and Transport events (Start 0xFA, Continue 0xFB, Stop 0xFC).
Recorded timestamps come from each event itself, not from the display, so a live performance (and DRIFT's arpeggiator) is captured tightly even when the frame rate drops. The exception: the MIDI File player advances on the render loop, so re-recording a played file through DRIFT under heavy visual load can smear its timing onto the frame grid. For the cleanest bounce of processed MIDI, play the part live, or lighten the visuals (fewer modules / less glow) while re-recording from a file.
Export as MIDI File
After a take, a single ⬇ Export pill appears in the toolbar. Its popover bundles every export format in one place, MIDI File (Type 0 / Type 1), Raw Data (.csv) and Notation Sheet (PNG), and it stays open after each download, so you can grab several formats from the same recording.
Exports the recording as a Standard MIDI File importable into any DAW.
MIDI File Format (Type 0 / Type 1)
Before exporting, you can choose between two Standard MIDI File formats:
Type 0, Single Track
All MPE channels are merged into one track. Maximum compatibility, supported by every DAW and hardware device. Best choice if you simply want to re-import and play back the recording.
Type 1, Multi-Track
Each MPE channel is written to its own separate track. Ideal for post-processing in a DAW: each voice (finger) appears on its own lane, making it easy to edit individual expression curves, apply per-channel processing, or inspect specific notes in isolation.
Tempo: The actual played tempo is measured from recorded MIDI Clock pulses using a median inter-pulse calculation. This tempo is embedded as a Tempo meta-event. If no clock was received, the file defaults to 120 BPM.
Common format details: 480 PPQN · All MPE channels included · Clock and Transport bytes embedded at their exact tick positions.
The filename includes the date, time, duration, and measured BPM, e.g. mpe-insight-2026-06-20_14h30m_45s_128bpm.mid.
Export as CSV
Exports every recorded event as a table row. Columns:
| Column | Description |
|---|---|
| time_ms | Timestamp in milliseconds from recording start |
| status_hex | Raw status byte in hex (e.g. 0x90) |
| type | Message type label |
| channel | MIDI channel number (1-16) |
| data1 | First data byte (note number, controller number, etc.) |
| data2 | Second data byte (velocity, value, etc.) |
| label | Human-readable description |
| note_name | Note name for Note On/Off and Poly AT messages |
Clock pulses appear as type Clock / label MIDI Clock. Transport events appear as type Transport with labels Clock Start, Clock Continue, or Clock Stop.
Export as Lead Sheet (PNG)
After a take, open ⬇ Export in the toolbar: in the Notation Sheet section, 🎼 Generate & Download renders the whole recording as classic notation: a paginated grand staff, one system per line, stacked vertically. A short take downloads as one PNG; a long one splits automatically into several PNG pages (-p1, -p2, …) so no single image exceeds what the browser can render. The engraving follows your Grand Staff module settings (key signature, colours, chord detection), and chord symbols sit on one constant lane above the staves, just like a printed lead sheet.
Where bar lines and line breaks fall is decided by the Tempo Source:
Manual BPM
Set BPM (20-300) and time signature yourself, and choose how many bars go on each line (1-16).
MIDI Clock
Uses the tempo detected from incoming MIDI Clock at the moment recording started, bar lines phase-locked to the actual downbeat.
Free
No bar lines, lines break after a set number of seconds instead of bars. For rubato and free playing.
Performance Meter
A small ● fps pill at the right end of the toolbar shows the app's health at a glance: live FPS, frame time in milliseconds and the main-thread load, the share of the 60 fps frame budget actually in use. Green means comfortable headroom, amber is close to the ceiling, red means the app can't hold 60 fps. Click the pill for a per-module render breakdown that shows which module costs the most. FORGE reports a GPU line of its own there, because its cost sits on the graphics card rather than in the module row, and it lowers its own render scale to 75 or 50 per cent before the frame rate gives way, then climbs back when there is room. If the system falls back to software rendering, a red line says so: without a GPU everything is slow, and that is worth knowing before you blame a module. The meter can be shown or hidden with the Performance meter checkbox in Global Settings, while hidden it costs nothing.
Appearance & Theme
The entire interface colour system is adjustable in real time from the settings panel.
Interface Color
HSL picker controlling hue, saturation, and brightness of all surfaces, borders, and title bars. Below 50% brightness = Dark Mode; above = Light Mode.
Accent Color
Separate HSL picker for highlight colours, active buttons, focus rings, and title text.
Brightness & Intensity
Global brightness filter (30-100%) and saturation filter (0-100%) applied to the entire interface.
Built-in Themes
Eight presets: Midnight · Daylight · Ember · Forest · Rosé · Violet · Mono · Glacier.
Transparent Modules
Every visual module has its own Transparent BG toggle in its settings, the module keeps its content but drops its panel background. ◩ All Transparent in Global Settings temporarily shows every module transparent without touching any module's own Transparent BG setting.
Keyboard Shortcuts
| Shortcut | Action |
|---|---|
| Ctrl+Z | Step back to before the last destructive action (20 steps) |
Supported Controllers
MPE Insight works with any class-compliant MIDI controller over standard MIDI. No custom drivers or plugins are required. An MPE controller delivers the five expression dimensions itself; with anything else, DRIFT generates them, and every module downstream sees the same MPE stream.
Any MIDI keyboard
Switch DRIFT on for per-note pressure, pitch and timbre motion
ROLI Seaboard
LinnStrument
Sensel Morph
Haken Continuum
Expressive E Osmose
Joué
Ableton Push 3
Enable MPE in Live: Push settings → enable "MPE Mode"
Ableton Push 2
Enable MPE in Live: Push settings → enable "MPE Mode"
ROLI Airwave
Gestural overlay, sends 5 air dimensions as MIDI CC per hand, not per-note MPE. Works as a modulation source alongside any keyboard.
Don't see yours? It works anyway. MPE Insight reads standard per-channel MIDI messages, not a vendor-specific protocol, so any class-compliant device is understood. The list above only says which controllers arrive with MPE already in the stream.